A professional-grade grip replacement is 70% preparation and 30% wrapping technique, yet many players wait until their racquet slips mid-serve to take action. It's frustrating to lose that sharp bevel feel or realize your base grip has completely compressed after a few hot months on court. If you've been hesitant to try a DIY tennis racquet grip replacement because you're confused about the difference between overgrips and base grips, you're certainly not alone in the Australian tennis community.
You don't need to be a pro to get a factory-fresh finish that restores your shot precision and comfort. This guide will help you master the wrap so you can enjoy a firm, contoured handle that stays secure in your hand during every rally. We'll explain which materials work best for our unique climate and how to choose the right tennis racquet replacement grips for your specific hand size. From stripping old adhesive to the final finishing tape, we're here to help you maintain your gear with total confidence.
Key Takeaways
- Learn to distinguish between the thick base foundation and the thin overgrip layer to ensure your handle provides long-lasting cushioning and support.
- Identify the essential tools for a professional finish, including how to safely extract staples and prep the handle pallet for a fresh adhesive bond.
- Tailor your DIY tennis racquet grip replacement to your local Australian climate, choosing specific materials for either tropical humidity or desert heat.
- Master the specific wrapping technique required to restore the sharp bevel feel needed for quick grip changes and improved shot precision.
- Recognize the signs of structural hardware damage that a new grip won't fix, knowing when it is time to browse high-performance tennis racquet grips or seek expert help.
Understanding DIY Tennis Racquet Grip Replacement vs. Overgrips
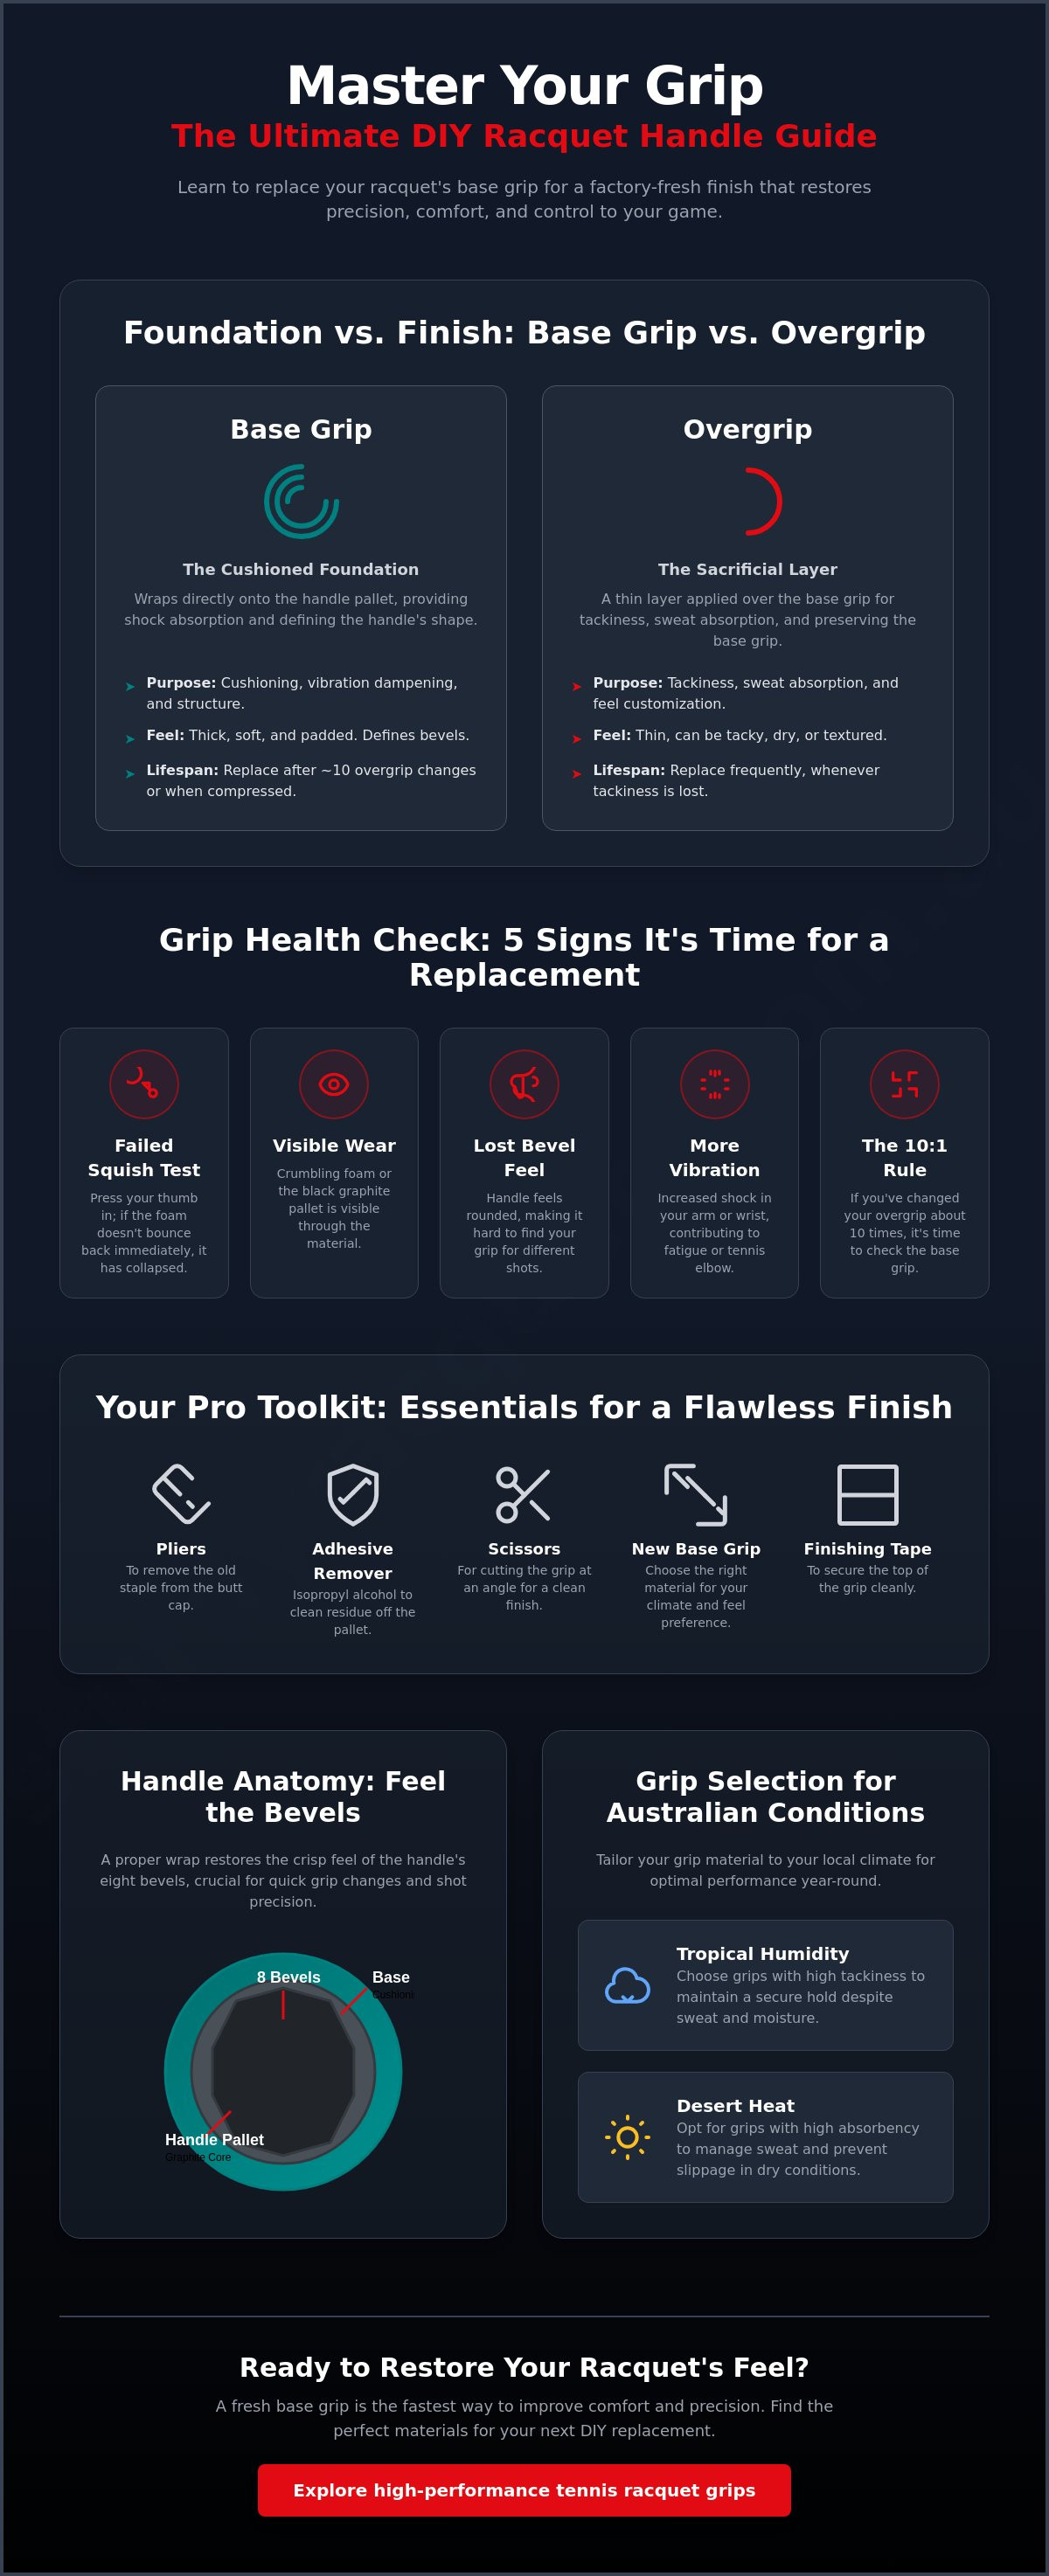
Many players make the mistake of layering overgrip after overgrip without ever checking the state of the foundation. A DIY tennis racquet grip replacement is about more than just aesthetics; it's about structural integrity. The base grip is the thick, cushioned layer that wraps directly around the racquet handle pallet. It's designed to absorb the bulk of the vibration from every heavy groundstroke while defining the shape of the handle. If this layer is compressed or "dead," even the most expensive racquet will feel like a vibrating piece of wood in your hand.
To better understand this concept, watch this helpful video:
In contrast, what is an overgrip? It is a thin, sacrificial layer meant to provide sweat absorption and tackiness. While overgrips are easy to swap out, they can't compensate for a failed base grip. You'll know your foundation has failed if you notice crumbling foam underneath the tape, lingering odors that won't go away, or if you can actually see the black graphite of the racquet pallet through the worn material. Ignoring these signs often leads to a loss of bevel feel, making it nearly impossible to find your continental or semi-western grip during a fast rally.
When to replace the base grip vs. adding an overgrip
Try the "squish test" to check your racquet's health. Press your thumb firmly into the grip; if it doesn't bounce back immediately, the foam cells have collapsed. Typically, one base grip should last through roughly ten overgrip changes. Beyond that, the shock absorption disappears. This isn't just about comfort. A worn-out base grip sends more vibration into your arm, which is a leading contributor to tennis elbow and wrist fatigue. If your handle feels "hollow" or too small, it's time to strip it back and start fresh.
The technical anatomy of a tennis racquet handle
The handle isn't just a round stick. It consists of a pallet with eight distinct bevels that allow your hand to "index" the racquet position. Mastering a DIY tennis racquet grip replacement allows you to keep these bevels feeling crisp and defined. At the bottom, the flared butt cap provides a leverage point for your pinky finger, helping you generate more whip on serves. When you wrap a new grip, you ensure it interacts perfectly with the underlying pallet to maintain your preferred handle size. You can find high-quality tennis racquet accessories to help you get the job done right.
Essential Tools for Racket Handle Maintenance
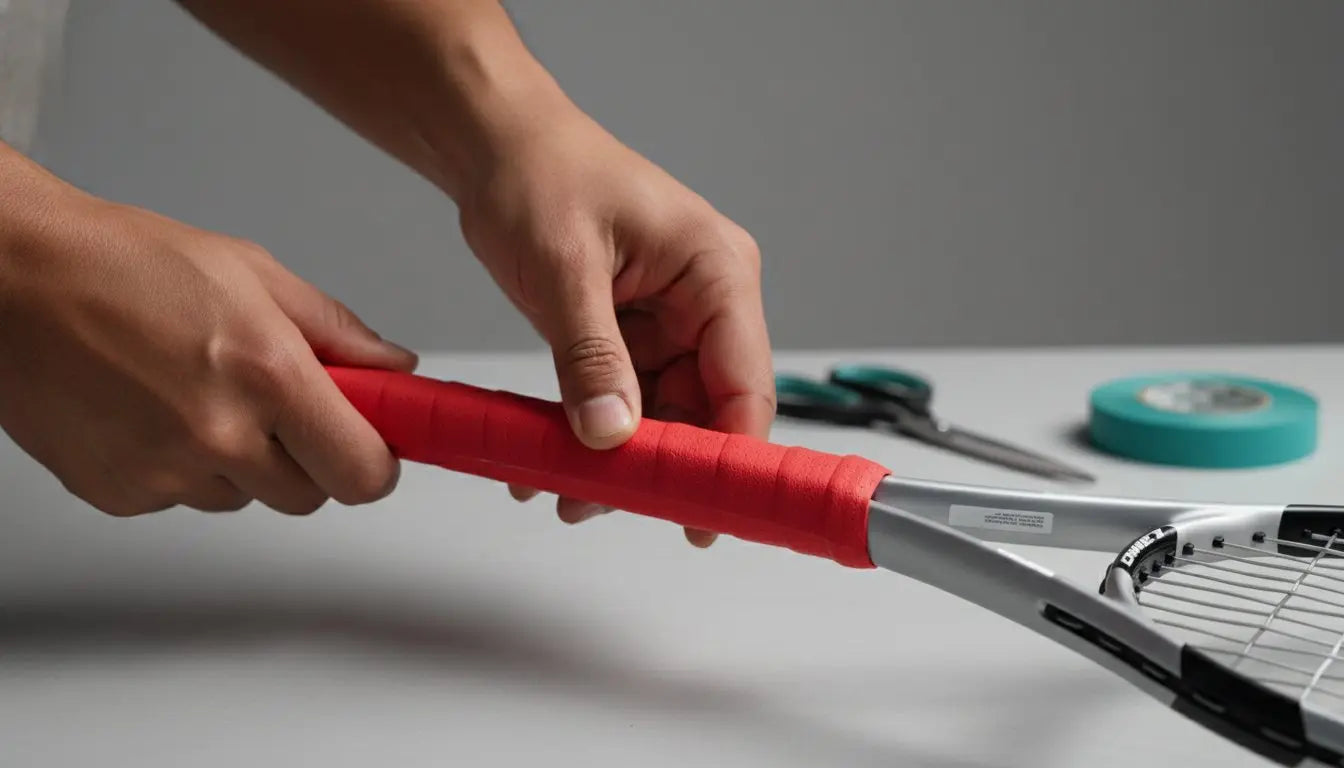
Starting a DIY tennis racquet grip replacement without the right tools is a recipe for a lumpy, uneven handle. You want that factory-fresh feel, not a handle that feels like it was wrapped in a hurry. Most players assume they only need a new roll of tape and some scissors, but the difference between a mediocre job and a pro finish lies in the preparation. Picking up high-quality professional tennis racquet accessories ensures your tools match the quality of your frame.
Before you even open your new grip, you need to clear the deck. A pair of needle-nose pliers or a small flathead screwdriver is essential for removing the factory staple located at the butt cap. If you skip this, the old staple will create a sharp protrusion under your new grip. Next, you'll need a cleaning agent. Old adhesive residue is the enemy of a tight wrap. Using isopropyl alcohol or a dedicated goo-remover allows you to strip the pallet back to its original state. While you can follow a standard 8-step grip replacement guide for the basics, the pros know that surface preparation is where the battle is won or lost.
Choosing your replacement grip material
Your choice of material significantly impacts your connection to the ball. Leather grips are the gold standard for players who want maximum feedback. They don't compress much, meaning you'll feel every bevel of the handle clearly. However, they are heavier and offer little vibration dampening. Synthetic cushioned grips are the opposite; they use foam or gel layers to protect your joints. For those playing in humid Australian conditions, perforated textures are a lifesaver. These small holes increase the surface area and allow moisture to move away from your palm. Consider these factors during your next DIY tennis racquet grip replacement to ensure the racquet suits your specific style of play.
Optional professional tools for a factory finish
If you want your racquet to look like it just came off a professional stringing machine, consider a few extra items. A manual staple gun allows you to secure the start of the grip to the butt cap, preventing it from shifting during heavy use. Sharp scissors are non-negotiable. If your blades are dull, you'll end up with a frayed edge that eventually unravels the top of your grip. Many experts also prefer using high-quality electrical tape for the top seal because it offers more stretch and a better bond than the short strips included in most retail packs. If you're unsure which texture will suit your game best, feel free to ask our expert team for a personalized recommendation.
Selecting the Best Replacement Grip for Australian Conditions
Australia's climate is a unique beast for tennis gear. Choosing the right material for your DIY tennis racquet grip replacement depends heavily on where you play. In high-humidity cities like Brisbane and Sydney, sweat is the primary enemy. High-absorption synthetics with deep perforations are vital here to prevent the racquet from twisting during a heavy serve. Conversely, the dry, searing heat of Perth and Adelaide requires a different strategy. In these conditions, moisture evaporates almost instantly. This can leave some grips feeling slick or dusty. A tacky, non-slip surface that maintains its "grab" without needing constant moisture is the smarter call for the western and southern states.
Melbourne players face the ultimate challenge of four seasons in one afternoon. A versatile, all-weather grip that offers a balance of tackiness and absorption is essential for the Victorian climate. Regardless of your location, the Australian sun is relentless. High UV exposure doesn't just fade the colour; it actually degrades the chemicals in the adhesive backing. This often leads to the "goop" effect, where the glue seeps through the grip material. It makes the handle feel permanently sticky or causes the grip to shift during play, ruining your shot precision.
Material durability in high UV environments
Natural leather is remarkably resilient against extreme heat. Unlike synthetic foams that can "melt" or lose their structural integrity when baked in a car boot, leather remains stable over years of use. If you prefer synthetics, watch for signs of breakdown like a "spongy" feel that doesn't offer any rebound. To extend the life of your gear, never store your racquet in the car boot. Temperatures in an Australian car can easily exceed 60°C. This destroys both the grip adhesive and the tension in your strings, leading to a costly trip to the pro shop.
Customising handle size during replacement
Replacing your grip is the perfect time to fine-tune your handle size for better performance. If your current racquet feels slightly too large, you can "downsize" by choosing a thin replacement grip, usually around 1.5mm thick. For those needing a larger handle, applying a heat-shrink sleeve to the pallet before the grip can add a half-size. This is a critical step for injury prevention for racquet sports, as a poorly fitted handle often leads to muscle strain or tennis elbow. You can find all the essential tennis equipment accessories needed for these modifications in our collection. Mastering these tweaks during a DIY tennis racquet grip replacement ensures your equipment evolves with your game.
Step-by-Step Guide to Replacing Your Base Grip
Execution is everything for a DIY tennis racquet grip replacement. You've already selected your materials and gathered your tools; now it's time to transform that worn-out handle into a precision instrument. A sloppy wrap can lead to air pockets that shift during a match, while a perfect one makes the racquet feel like an extension of your arm. Follow these phases to ensure your handle meets professional standards.
Phase 1: Stripping and cleaning the handle
Peel away the old material and any finishing tape carefully. You'll likely find a small staple at the base of the handle near the butt cap. Use your pliers to pull this out without gouging the plastic pallet underneath. Once the old material is gone, you'll see strips of dried glue and foam residue. Don't wrap over this. Apply your cleaning agent to a cloth and scrub the pallet until it's smooth and slightly tacky to the touch. This is also the best time to inspect your butt cap. If you find any cracks or notice the cap is wobbling, address those structural issues before applying new material.
Phase 2: The wrapping technique for right and left-handers
The direction you wrap is a frequent mistake in a DIY tennis racquet grip replacement. If you're right-handed, wrap in a clockwise direction as you look down from the head of the racquet toward the butt cap. Left-handers should wrap counter-clockwise. This ensures your fingers naturally pull the grip tighter during play rather than unravelling it. Start by aligning the tapered end of the grip with the edge of the butt cap. Secure it with a staple or the adhesive tab. Maintain firm, consistent tension as you rotate the racquet. Overlap the edges by exactly 1/8th of an inch. This creates a seamless surface where the bevel edges remain sharp and easy to detect through the material.
Phase 3: The professional finish
As you reach the top of the handle, don't just stop and tape it. Hold the grip in place and mark a diagonal line that follows the top edge of the handle. Use your sharp scissors to cut along this line. This creates a flush, professional edge that doesn't bulk up under the finishing tape. Wrap the finishing tape around the top twice, pulling it tight enough to create a secure seal but not so tight that it snaps. A fresh grip is a great start, but check our comprehensive racquet restringing guide to ensure your strings are as ready for the court as your handle is. If you run into any trouble during the process, you can always speak with our expert racquet technicians for guidance.
When to Seek Professional Customisation and Maintenance
Mastering a DIY tennis racquet grip replacement is a badge of honour for any club player, but there are times when the handle requires more than just a fresh wrap. If you've finished your re-grip but still hear a faint clicking sound during a serve, the issue isn't the tape. This usually points to a loose or broken butt cap. These plastic components are often stapled or glued to the pallet; if they become detached or cracked, they can't be fixed with a simple DIY approach. A professional technician can properly secure the cap or replace it entirely to ensure your racquet doesn't fail you during a critical tie-break.
Another limitation involves significant grip-size adjustments. While we've discussed using thin grips or heat-shrink sleeves to tweak the feel, jumping two full sizes with DIY methods often rounds out the bevels. This ruins the precise handle geometry you need for quick grip transitions. Professional customisation ensures that even high performance tennis racquets maintain their ergonomic shape after a size modification. There's also the trend in 2026 towards smaller grip sizes to allow for more wrist snap and topspin. If you're looking to downsize your handle permanently, a professional can often swap the entire pallet to achieve this without compromising the racquet's balance.
Advanced handle customisation
For players looking to change how their racquet swings, handle weighting is a vital technique. This involves applying lead or tungsten tape directly to the pallet before the base grip is installed. It's a delicate process; even a few grams of tail-weighting can shift the balance point, making a head-heavy frame feel more headlight and manoeuvrable. If you're using older frames, the internal pallets can sometimes collapse or compress unevenly. Repairing these requires stripping the racquet down to the bare graphite and rebuilding the surface, a task that requires specialized tools and steady hands.
Next steps for your equipment
Once you've completed your re-grip, take it to the court for a test session. You should feel the eight bevels clearly through your palm without any squishy movement. If the handle feels too round, you may have overlapped the grip too much. For most active players in Australia, we recommend a maintenance schedule where you change your overgrip every 10 to 15 hours of play and perform a full base grip swap every 6 to 12 months. This ensures the foam cells in the foundation provide the necessary shock absorption for your elbow. If you're unsure about the structural health of your frame or need help with a complex modification, you can always reach out for expert racquet maintenance and advice to keep your gear in peak condition.
Step Onto the Court with Confidence
Mastering the foundation of your racquet is the fastest way to regain control over your shots. By choosing the right materials for our Australian climate and following a precise wrapping technique, you've ensured your handle feels as good as the day it left the factory. A fresh base grip isn't just about comfort. It's a vital part of protecting your elbow and maintaining that sharp bevel feel. This small bit of maintenance makes a massive difference in your shot precision during long rallies.
Taking the time for a DIY tennis racquet grip replacement shows you're serious about your performance. If you've encountered structural issues like a loose butt cap or simply want the peace of mind that comes with a pro touch, our team is ready. You can get expert help with your racquet maintenance at our store in Brooklyn, Victoria. We offer professional in-store stringing and customisation, providing expert advice for players of all levels. Whether you're a beginner or a seasoned pro, we're here to support your journey. Grab your racquet and get ready for your best season yet!
Frequently Asked Questions
Do I need a staple gun to replace a tennis racquet base grip?
No, you don't strictly need a staple gun, but it's the professional choice for securing the start of the wrap. Most retail packs come with an adhesive tab on the tapered end that works for a DIY tennis racquet grip replacement. However, a staple prevents the grip from shifting at the base during heavy hitting. If you don't have a gun, just ensure you apply extra tension during the first two rotations around the butt cap to keep it locked in place.
How is a replacement grip different from a tennis overgrip?
A replacement grip is the thick foundation of your handle, while an overgrip is a thin layer used for temporary sweat absorption. The base grip provides the primary cushioning and vibration dampening for your arm. Overgrips are designed to be changed frequently, often every few matches. If you find your handle feels hollow or the bevels are too sharp, it's likely time for a full replacement rather than just adding another overgrip layer.
Can I put a new replacement grip over the old one to make the handle bigger?
You should never wrap a new replacement grip over an old one because it rounds out the bevels and ruins your control. This "double gripping" makes the handle feel like a cylinder, making it hard to find your continental or semi-western grip. If you need to increase your handle size, it's better to use a heat-shrink sleeve directly on the pallet. This adds bulk while maintaining the sharp edges needed for precision shot-making.
How often should I replace my tennis racquet base grip?
You should replace your base grip every 6 to 12 months, or roughly every 10 overgrip changes. Over time, the foam cells in the grip collapse under the pressure of your hand. This leads to a "dead" feel and increased vibration that can cause tennis elbow. If you play more than three times a week in hot Australian conditions, you might need to perform a DIY tennis racquet grip replacement more frequently to maintain optimal comfort.
What is the best way to remove old grip adhesive from the handle?
The most effective way to remove stubborn residue is by using a cloth dampened with isopropyl alcohol or a dedicated adhesive remover. Simply peeling off the old tape usually leaves sticky strips behind. These lumps will show through your new grip if they aren't cleared. Scrub the pallet until it's completely smooth. This clean surface ensures the new adhesive bonds perfectly, preventing the grip from sliding or bunching up during your next match.
Should I wrap my grip clockwise or counter-clockwise?
Right-handed players should wrap clockwise, while left-handed players must wrap counter-clockwise as you look from the head down to the butt cap. This specific direction ensures that your fingers naturally pull the grip tighter as you play. If you wrap in the wrong direction, the friction from your palm will slowly push against the seams. This eventually leads to the grip unravelling at the top or shifting mid-point, which can be incredibly frustrating during a match.
How do I know if my tennis racquet handle size is correct?
The correct handle size allows you to fit the index finger of your non-hitting hand into the gap between your fingertips and palm when holding the racquet. If there's no room for your finger, the grip is too small. Using the right size is essential for injury prevention. A handle that's too small forces you to squeeze too hard, leading to fatigue. This is a vital step when choosing the best tennis racquets for your hand size.
What are the benefits of using a leather replacement grip?
Leather grips offer the best feedback and bevel definition, allowing you to feel exactly how the racquet head is positioned. They are much firmer than synthetic options and don't compress over time. This makes them a favourite for traditionalists and pro-level players. Additionally, leather is incredibly durable in the heat. It won't get "mushy" or lose its shape during a long summer afternoon on a hard court in Melbourne or Adelaide.
Share:
Tennis Racquet Grip Size Guide Australia: Find Your Perfect Fit in 2026